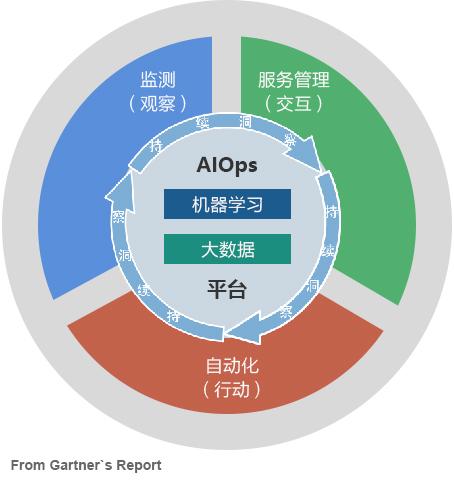
AIOps 一场颠覆传统运维的盛筵
810
2022-10-12
Kubernetes 健康状态检查 liveness 和 readiness
目录1、健康检查2、探针类型Liveness 存活性探针Readiness 就绪性探针3、探针执行方式HTTPExecTCP4、Liveness-exec 样例5、readiness-exec 样例6、iveness-http 样例7、readiness-http 样例8、TCP liveness 和 readiness 探针9、Probe 详细配置10、健康检查在扩容中的应用 readiness11、健康检查在滚动更新中的应用01健康检查健康检查(Health Check)是让系统知道您的应用实例是否正常工作的简单方法。如果您的应用实例不再工作,则其他服务不应访问该应用或向其发送请求。相反,应该将请求发送到已准备好的应用程序实例,或稍后重试。系统还应该能够使您的应用程序恢复健康状态。强大的自愈能力是 Kubernetes 这类容器编排引擎的一个重要特性。自愈的默认实现方式是自动重启发生故障的容器。除此之外,用户还可以利用 Liveness 和 Readiness 探测机制设置更精细的健康检查,进而实现如下需求:零停机部署避免部署无效的镜像更加安全的滚动升级02探针类型Liveness 存活性探针Liveness 探针让 Kubernetes 知道你的应用程序是活着还是死了。如果你的应用程序还活着,那么 Kubernetes 就不管它了。如果你的应用程序已经死了,Kubernetes 将删除 Pod 并启动一个新的替换它。Readiness 就绪性探针Readiness 探针旨在让 Kubernetes 知道您的应用何时准备好其流量服务。Kubernetes 确保 Readiness 探针检测通过,然后允许服务将流量发送到 Pod。如果 Readiness 探针开始失败,Kubernetes 将停止向该容器发送流量,直到它通过。 判断容器是否处于可用 Ready 状态, 达到 ready 状态表示 pod 可以接受请求, 如果不健康, 从 service 的后端 endpoint 列表中把 pod 隔离出去。03探针执行方式HTTPHTTP 探针可能是最常见的自定义 Liveness 探针类型。即使您的应用程序不是 HTTP 服务,您也可以在应用程序内创建轻量级 HTTP 服务以响应 Liveness 探针。Kubernetes 去 ping 一个路径,如果它得到的是200或300范围内的 HTTP 响应,它会将应用程序标记为健康。否则它被标记为不健康。httpget 配置项host:连接的主机名,默认连接到 pod 的 IP。你可能想在 http header 中设置"Host"而不是使用 IP。 scheme:连接使用的 schema,默认 HTTP。path: 访问的 HTTP server 的 path。 httpHeaders:自定义请求的 header。HTTP 运行重复的header。 port:访问的容器的端口名字或者端口号。端口号必须介于 1 和65535 之间。Exec对于 Exec 探针,Kubernetes 则只是在容器内运行命令。如果命令以退出代码0返回,则容器标记为健康。否则,它被标记为不健康。当您不能或不想运行 HTTP 服务时,此类型的探针则很有用,但是必须是运行可以检查您的应用程序是否健康的命令。TCP最后一种类型的探针是 TCP 探针,Kubernetes 尝试在指定端口上建立 TCP 连接。如果它可以建立连接,则容器被认为是健康的;否则被认为是不健康的。如果您有 HTTP 探针或 Command 探针不能正常工作的情况,TCP 探测器会派上用场。例如,gRPC 或 FTP 服务是此类探测的主要候选者。04Liveness-exec 样例执行命令。容器的状态由命令执行完返回的状态码确定。如果返回的状态码是0,则认为 pod 是健康的,如果返回的是其他状态码,则认为 pod 不健康,这里不停的重启它。#cat liveness_exec.yamlapiVersion: v1kind: Podmetadata: labels: test: liveness-exec name: liveness-execspec: containers: - name: liveness-exec image: busybox args: - /bin/sh - -c - touch /tmp/healthy; sleep 30; rm -rf /tmp/healthy; sleep 600 livenessProbe: exec: command: - cat - /tmp/healthy initialDelaySeconds: 5 periodSeconds: 5periodSeconds 字段指定 kubelet 应每5秒执行一次活跃度探测。initialDelaySeconds 字段告诉 kubelet 它应该在执行第一个探测之前等待5秒。要执行探测,kubelet 将在 Container 中执行命令 cat /tmp/healthy。如果命令成功,则返回0,并且kubelet 认为 Container 是活动且健康的。如果该命令返回非零值,则 kubelet 会终止容器并重新启动它。05readiness-exec 样例apiVersion: apps/v1kind: Deploymentmetadata: name: busybox-deployment namespace: default labels: app: busyboxspec: selector: matchLabels: app: busybox replicas: 3 template: metadata: labels: app: busybox spec: containers: - name: busybox image: busybox:latest imagePullPolicy: IfNotPresent ports: - containerPort: 80 args: - /bin/sh - -c - touch /tmp/healthy; sleep 30; rm -rf /tmp/healthy; sleep 600 readinessProbe: exec: command: - cat - /tmp/healthy initialDelaySeconds: 5 periodSeconds: 5pod 启动,创建健康检查文件,这个时候是正常的,30s 后删除,ready 变成 0,但 pod 没有被删除或者重启,k8s 只是不管他了,仍然可以登录[root@k8s-master health]# kubectl get podsNAME READY STATUS RESTARTS AGEbusybox-deployment-6f86ddd894-l9phc 0/1 Running 0 3m10sbusybox-deployment-6f86ddd894-lh46t 0/1 Running 0 3mbusybox-deployment-6f86ddd894-sz5c2 0/1 Running 0 3m17s我们再登录进去,手动创建健康检查文件,健康检查通过[root@k8s-master health]# kubectl get podsNAME READY STATUS RESTARTS AGEbusybox-deployment-6f86ddd894-l9phc 1/1 Running 0 7m44sbusybox-deployment-6f86ddd894-lh46t 0/1 Running 0 7m34sbusybox-deployment-6f86ddd894-sz5c2 1/1 Running 0 7m51s[root@k8s-master health]#[root@k8s-master health]#[root@k8s-master health]#[root@k8s-master health]# kubectl exec -it busybox-deployment-6f86ddd894-lh46t /bin/sh/ # touch tmp/healthy/ # [root@k8s-master health]# kubeget podsNAME READY STATUS RESTARTS AGEbusybox-deployment-6f86ddd894-l9phc 1/1 Running 0 8m21sbusybox-deployment-6f86ddd894-lh46t 1/1 Running 0 8m11sbusybox-deployment-6f86ddd894-sz5c2 1/1 Running 0 8m28s[root@k8s-master health]#06iveness-http 样例#cat liveness_http.yamlapiVersion: apps/v1kind: Deploymentmetadata: name: nginx-deployment namespace: default labels: app: nginxspec: selector: matchLabels: app: nginx replicas: 2 template: metadata: labels: app: nginx spec: containers: - name: nginx image: nginx imagePullPolicy: IfNotPresent ports: - containerPort: 80 livenessProbe: httpGet: path: /index.html port: 80 httpHeaders: - name: X-Custom-Header value: hello initialDelaySeconds: 5 periodSeconds: 307readiness-http 样例创建一个2个副本的 deployment# cat readiness_http.yamlapiVersion: apps/v1kind: Deploymentmetadata: name: nginx-deployment namespace: default labels: app: nginxspec: selector: matchLabels: app: nginx replicas: 2 template: metadata: labels: app: nginx spec: containers: - name: nginx image: nginx imagePullPolicy: IfNotPresent ports: - containerPort: 80 readinessProbe: httpGet: path: /index.html port: 80 httpHeaders: - name: X-Custom-Header value: hello initialDelaySeconds: 5 periodSeconds: 3创建一个 svc 能访问# cat readiness_http_svc.yamlapiVersion: v1kind: Servicemetadata: name: nginxspec: type: NodePort ports: - port: 80 nodePort: 30001 selector: #标签选择器 app: nginx服务可以访问[root@k8s-master health]# kubectl get pods -o wideNAME READY STATUS RESTARTS AGE IP NODE NOMINATED NODE READINESS GATESnginx-deployment-7db8445987-9wplj 1/1 Running 0 57s 10.254.1.81 k8s-node-1
[root@k8s-master health]# kubectl apply -f app_v1.yamldeployment.extensions/app unchanged[root@k8s-master health]# kubectl get podsNAME READY STATUS RESTARTS AGEapp-6dd7f876c4-5hvdl 1/1 Running 0 6m17sapp-6dd7f876c4-9vcp7 1/1 Running 0 6m17sapp-6dd7f876c4-k59mm 1/1 Running 0 6m17sapp-6dd7f876c4-trw8f 1/1 Running 0 6m17sapp-6dd7f876c4-wrhz8 1/1 Running 0 6m17s[root@k8s-master health]#
接下来滚动更新应用# cat app_v2.yamlapiVersion: extensions/v1beta1kind: Deploymentmetadata: name: appspec: replicas: 5 template: metadata: labels: run: app spec: containers: - name: app image: busybox args: - /bin/sh - -c - sleep 30000 readinessProbe: exec: command: - cat - /tmp/healthy initialDelaySeconds: 10 periodSeconds: 5[root@k8s-master health]# kubectl get podsNAME READY STATUS RESTARTS AGEapp-6dd7f876c4-5hvdl 1/1 Running 0 14mapp-6dd7f876c4-9vcp7 1/1 Running 0 14mapp-6dd7f876c4-k59mm 1/1 Running 0 14mapp-6dd7f876c4-trw8f 1/1 Running 0 14mapp-6dd7f876c4-wrhz8 1/1[root@k8s-master health]# kubectl apply -f app_v2.yamldeployment.extensions/app configured[root@k8s-master health]# kubectl get podsNAME READY STATUS RESTARTS AGEapp-6dd7f876c4-5hvdl 1/1 Running 0 14mapp-6dd7f876c4-9vcp7 1/1 Running 0 14mapp-6dd7f876c4-k59mm 1/1 Terminating 0 14mapp-6dd7f876c4-trw8f 1/1 Running 0 14mapp-6dd7f876c4-wrhz8 1/1 Running 0 14mapp-7fbf9d8fb7-g99hn 0/1 ContainerCreating 0 2sapp-7fbf9d8fb7-ltlv5 0/1 ContainerCreating 0 3s[root@k8s-master health]# kubectl get podsNAME READY STATUS RESTARTS AGEapp-6dd7f876c4-5hvdl 1/1 Running 0 14mapp-6dd7f876c4-9vcp7 1/1 Running 0 14mapp-6dd7f876c4-k59mm 1/1 Terminating 0 14mapp-6dd7f876c4-trw8f 1/1 Running 0 14mapp-6dd7f876c4-wrhz8 1/1 Running 0 14mapp-7fbf9d8fb7-g99hn 0/1 ContainerCreating 0 9sapp-7fbf9d8fb7-ltlv5 0/1 Running 0 10s[root@k8s-master health]#[root@k8s-master health]# kubectl get podsNAME READY STATUS RESTARTS AGEapp-6dd7f876c4-5hvdl 1/1 Running 0 15mapp-6dd7f876c4-9vcp7 1/1 Running 0 15mapp-6dd7f876c4-trw8f 1/1 Running 0 15mapp-6dd7f876c4-wrhz8 1/1 Running 0 15mapp-7fbf9d8fb7-g99hn 0/1 Running 0 68sapp-7fbf9d8fb7-ltlv5 0/1 Running 0 69s[root@k8s-master health]#从 Pod 的 AGE 栏可判断,最后 2 个 Pod 是新副本,目前处于 NOT READY 状态。旧副本从最初 5个减少到 4 个。l DESIRED 5 表示期望的状态是 5个 READY 的副本。l UP-TO-DATE 2 表示当前已经完成更新的副本数:即 2 个新副本。l AVAILABLE 4 表示当前处于 READY 状态的副本数:即 4个旧副本。在我们的设定中,新副本始终都无法通过 Readiness 探测,所以这个状态会一直保持下去。上面我们模拟了一个滚动更新失败的场景。不过幸运的是:Health Check 帮我们屏蔽了有缺陷的副本,同时保留了大部分旧副本,业务没有因更新失败受到影响。滚动更新可以通过参数 maxSurge 和 maxUnavailable 来控制副本替换的数量。
出处:http://dwz.date/dtaE
51Reboot 课程介绍如下
发表评论
暂时没有评论,来抢沙发吧~