
实时警报通知:微信告警通知的重要性解析
1777
2023-06-28
BPMN定义了不同的事件类型。事件包含开始(Start)、中间(Intermediate)、边界(Boundary)和结束(End)四种类型。根据触发方式不同,可以分为捕获事件(Catching Event)和抛出事件(Throwing Event)。以下是Camunda支持的事件类型。
1、启动事件Start Events
启动事件定义流程或子流程开始的位置。流程引擎支持不同类型的启动事件:
Blank、Timer、Message、Signal、Conditional。
引擎至少需要一个启动事件来实例化一个流程。每个流程定义最多可以有一个空白或计时器启动事件。可以有多个消息或信号启动事件。
2、空白事件None Events
无事件是未指定的事件,也称为“空白”事件。例如,' none '启动事件技术上意味着启动流程实例的触发器是未指定的。这意味着引擎无法预知何时必须启动流程实例。当流程实例通过API调用startProcessInstanceBy…方法。
ProcessInstance processInstance = runtimeService.startProcessInstanceByKey('invoice');
3、消息事件Message Events
消息事件是引用已命名消息的事件。一条消息有一个名称和一个有效负载。与信号不同,消息事件总是指向单个收件人。
4、计时器事件Timer Events
计时器事件是由定义的计时器触发的事件。它们可以用作启动事件、中间事件或边界事件。边界事件可以中断,也可以不中断。
5、错误事件Error Events
捕获/抛出错误的事件。错误事件是由已定义的错误触发的事件。
Demo项目代码:
https://gitee.com/AnAnXiEr/activiti6-demo
1、事件与监听器的原理
2、监听器的配置方式
3、Activiti的事件监听
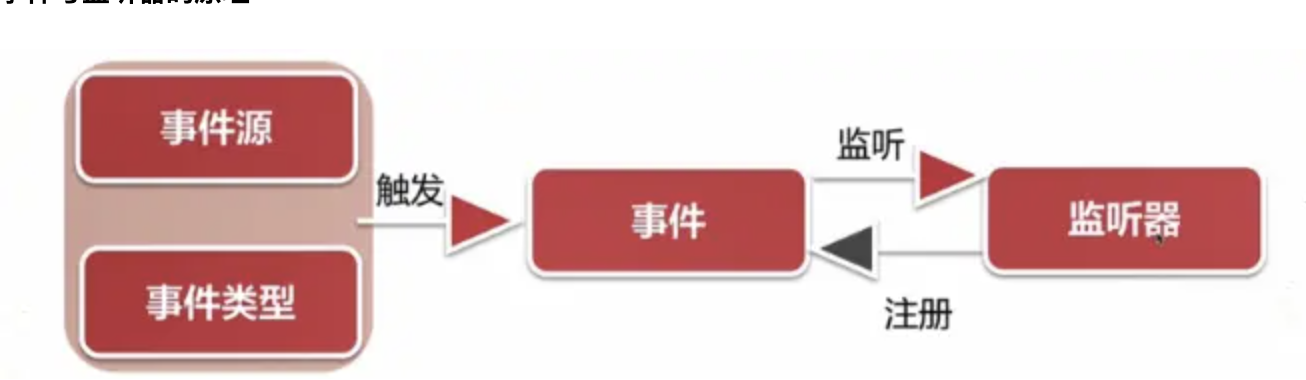
流程引擎启动时、监听器就注册到事件类型上
可以注册到所有的事件类型上,也可以注册到指定的几个事件类型
eventListeners:监听所有事件派发通知
typedEventListeners:监听指定事件类型的通知
activiti:eventListener:只监听特定流程定义的事件
事件源:Process Engine
事件类型:ENGINE_CREATED
事件:ActivitiEvent
监听:dispatcheEvent
注册:addEventListener
监听器:ActivitiEvent Listener

ActivitiEvent:事件对象
ActivitiEventListener:监听器
ActivitiEventType:事件类型
 <?xml version="1.0" encoding="UTF-8"?><beans xmlns="http://www.springframework.org/schema/beans"
       xmlns:xsi="http://www.w3.org/2001/XMLSchema-instance"
       xsi:schemaLocation="http://www.springframework.org/schema/beans http://www.springframework.org/schema/beans/spring-beans.xsd">

    <bean class="org.activiti.engine.impl.cfg.StandaloneInMemProcessEngineConfiguration"
          id="processEngineConfiguration">
        <!--<property name="commandInvoker" ref="mdcCommandInvoker"/>-->

        <!--eventListeners-->
        <!--<property name="eventListeners">-->
            <!--<list>-->
                <!--<bean class="com.imooc.activiti.activitidemo.event.ProcessEventListener"></bean>-->
            <!--</list>-->
        <!--</property>-->

        <!--typedEventListeners-->
        <property name="typedEventListeners">
            <map>
                <entry key="PROCESS_STARTED">
                    <list>
                        <bean class="com.imooc.activiti.activitidemo.event.ProcessEventListener"></bean>
                    </list>
                </entry>
            </map>
        </property>
    </bean>


    <bean class="com.imooc.activiti.activitidemo.interceptor.MDCCommandInvoker" id="mdcCommandInvoker"/></beans>
 package com.imooc.activiti.activitidemo.event;import org.activiti.engine.delegate.event.ActivitiEvent;import org.activiti.engine.delegate.event.ActivitiEventListener;import org.activiti.engine.delegate.event.ActivitiEventType;import org.slf4j.Logger;import org.slf4j.LoggerFactory;/**
 * @Description 流程event
 * @Author 胡浩
 * @Date 2019/8/20
 **/public class ProcessEventListener implements ActivitiEventListener {


    private static final Logger LOGGER = LoggerFactory.getLogger(ActivitiEventListener.class);

    @Override
    public void onEvent(ActivitiEvent activitiEvent) {
        ActivitiEventType eventType = activitiEvent.getType();
        if (ActivitiEventType.PROCESS_STARTED.equals(eventType)) {
            LOGGER.info("流程启动 {} \t {}", eventType, activitiEvent.getProcessInstanceId());
        } else if (ActivitiEventType.PROCESS_COMPLETED.equals(eventType)) {
            LOGGER.info("流程结束 {} \t {}", eventType, activitiEvent.getProcessInstanceId());
        }
    }

    @Override
    public boolean isFailOnException() {
        return false;
}} @Test
@Deployment(resources = "mdc-process.bpmn20.xml")
public void testConfig() {
ProcessInstance processInstance = activitiRule.getRuntimeService().startProcessInstanceByKey("my-process");
Task task = activitiRule.getTaskService().createTaskQuery().singleResult();
activitiRule.getTaskService().complete(task.getId());
//手工发送事件
activitiRule.getRuntimeService().dispatchEvent(new ActivitiEventImpl(ActivitiEventType.CUSTOM));
}CustomEventListener
package com.imooc.activiti.activitidemo.event;import org.activiti.engine.delegate.event.ActivitiEvent;import org.activiti.engine.delegate.event.ActivitiEventListener;import org.activiti.engine.delegate.event.ActivitiEventType;import org.slf4j.Logger;import org.slf4j.LoggerFactory;/**
 * @Description 自定义event
 * @Author 胡浩
 * @Date 2019/8/20
 **/public class CustomEventListener implements ActivitiEventListener {


    private static final Logger LOGGER = LoggerFactory.getLogger(ActivitiEventListener.class);

    @Override
    public void onEvent(ActivitiEvent activitiEvent) {
        ActivitiEventType eventType = activitiEvent.getType();
        if (ActivitiEventType.CUSTOM.equals(eventType)) {
            LOGGER.info("监听自定义事件 {} \t {}", eventType, activitiEvent.getProcessInstanceId());
        }
    }

    @Override
    public boolean isFailOnException() {
        return false;
    }}
cfg
<?xml version="1.0" encoding="UTF-8"?><beans xmlns="http://www.springframework.org/schema/beans"
       xmlns:xsi="http://www.w3.org/2001/XMLSchema-instance"
       xsi:schemaLocation="http://www.springframework.org/schema/beans http://www.springframework.org/schema/beans/spring-beans.xsd">

    <bean class="org.activiti.engine.impl.cfg.StandaloneInMemProcessEngineConfiguration"
          id="processEngineConfiguration">
        <!--<property name="commandInvoker" ref="mdcCommandInvoker"/>-->

        <!--eventListeners-->
        <property name="eventListeners">
            <list>
                <!--<bean class="com.imooc.activiti.activitidemo.event.ProcessEventListener"></bean>-->
                <bean class="com.imooc.activiti.activitidemo.event.CustomEventListener"></bean>
            </list>
        </property>

        <!--typedEventListeners-->
        <!--<property name="typedEventListeners">-->
            <!--<map>-->
                <!--<entry key="PROCESS_STARTED">-->
                    <!--<list>-->
                        <!--<bean class="com.imooc.activiti.activitidemo.event.ProcessEventListener"></bean>-->
                    <!--</list>-->
                <!--</entry>-->
            <!--</map>-->
        <!--</property>-->
    </bean>


    <bean class="com.imooc.activiti.activitidemo.interceptor.MDCCommandInvoker" id="mdcCommandInvoker"/></beans>
 @Test
    @Deployment(resources = "mdc-process.bpmn20.xml")
    public void testConfig() {
        ProcessInstance processInstance = activitiRule.getRuntimeService().startProcessInstanceByKey("my-process");
        Task task = activitiRule.getTaskService().createTaskQuery().singleResult();
        activitiRule.getTaskService().complete(task.getId());

        //代码监听
        activitiRule.getRuntimeService().addEventListener(new CustomEventListener());

        //手工发送事件
        activitiRule.getRuntimeService().dispatchEvent(new ActivitiEventImpl(ActivitiEventType.CUSTOM));

}(下列代码用create-react-app创建的,比较方便,大家写示例的时候可以直接用)
import React, { Component } from 'react';class App extends Component {
  // handleParent = () => {  //   console.log('爸爸')  // }  //  // handleChild = () => {  //   console.log('儿子')  // }  componentDidMount () {
      document.getElementById('child').addEventListener('click', function() {
          console.log('document')
      })
  }

  render() {
    return (
      <div className="App">
        <div id="parent">
          <div id="child">儿子</div>
        </div>
      </div>
    );
  }}export default App;
当上面代码执行的时候,大家打开Chrome浏览器审查元素

接下来把注释的代码handleChild放出来如下
import React, { Component } from 'react';class App extends Component {
  // handleParent = () => {  //   console.log('爸爸')  // }  //  handleChild = () => {
    console.log('儿子')
  }
  componentDidMount () {
      document.getElementById('child').addEventListener('click', function() {
          console.log('document')
      })
  }

  render() {
    return (
      <div className="App">
        <div id="parent">
          <div onClick={this.handleChild} id="child">儿子</div>
        </div>
      </div>
    );
  }}export default App;
打开Chrome浏览器审查元素这时候会发现,多出两个东西,其实就是React内部实现的类似浏览器的事件流机制,把子节点的方法代理到了document

上面就证明了,React组件绑定事件本质上是代理到 document 上的
那么接下来看看把handleParent代码放出来,点击“儿子”看看会出现什么效果
import React, { Component } from 'react';class App extends Component {
  handleParent = () => {
    console.log('爸爸')
  }

  handleChild = () => {
    console.log('儿子')
  }
  componentDidMount () {
    document..getElementById('child').addEventListener('click', function() {
      console.log('直接绑定在child上的事件')
    })
    document.addEventListener('click', function() {
      console.log('直接绑定在document上的事件')
    })
  }

  render() {
    return (
      <div className="App">
        <div onClick={this.handleParent} id="parent">
          <div onClick={this.handleChild} id="child">儿子</div>
        </div>
      </div>
    );
  }}export default App;
效果如下

点击“儿子”之后,事件往上冒泡
1、首先执行的是直接绑定在child上的事件
2、事件流沿着 DOM 结构向上冒泡到 document,执行到了React的事件流机制中的handleChild,冒泡事件顺带执行了handleParent,和直接绑定在document上的事件
那么我现在想阻止事件冒泡,不让handleParent和document里绑定的事件执行
在handleChild事件里添加两个方法
1、e.stopPropagation(),此方法为React内部模拟原生JS实现的一个阻止冒泡机制的方法
2、想要在React里阻止原生JS事件冒泡,只需用e.nativeEvent.stopImmediatePropagation()方法便可,它是原生事件对象的用于阻止 DOM 事件的进一步捕获或者冒泡,且该元素的后续绑定的相同事件类型的事件也被一并阻止。
实战例子:
点击按钮,出现一张图片,点击图片以外的任意位置,实现图片隐藏。
class ImagePop extends Component {
  constructor(props) {
    super(props);
    this.handleClick = this.handleClick.bind(this);
    this.handleClickImage = this.handleClickImage.bind(this);
    this.state = {
      active: false,
    };
  }

  componentDidMount() {
    document.addEventListener('click', e => {
      this.setState({
        active: false,
      });
    });
  }

  componentWillUnmount() {
    document.removeEventListener('click');
  }

  handleClick() {
    e.nativeEvent.stopImmediatePropagation()
    this.setState({
      active: true,
    });
  }

  handleClickImage(e) {
    e.nativeEvent.stopImmediatePropagation()
  }

  render() {
    return (
      <div className="container">
        <button className="imgButton" onClick={this.handleClick}>图片按钮</button>
        <div
          className="img"
          style={{ display: this.state.active ? 'block' : 'none' }}
          onClick={this.handleClickImage}
        >
          <img src="img.jpg" alt="img" />
        </div>
      </div>
    );
  }
}流程引擎与流程事件流程引擎 事件驱动事件流程引擎设计事件流流程引擎审批流程引擎事件管理流程引擎与事件操作java工作流引擎流程事件
系统集成事件驱动流程引擎
发表评论
暂时没有评论,来抢沙发吧~