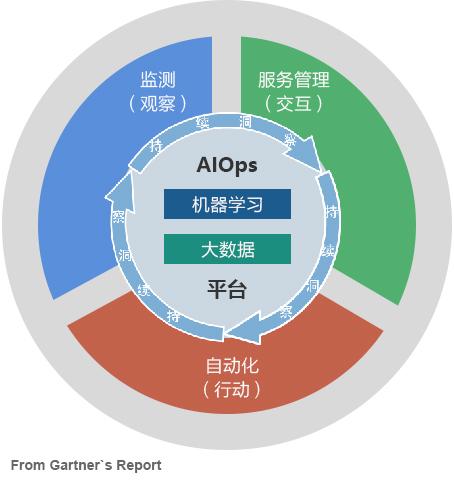
AIOps 一场颠覆传统运维的盛筵
896
2022-09-07
如何借助 HealthKit 打造一款健身应用?(如何借助笼状物破坏其余三座磐键)
根据新闻报导,健康与健美在今时今日的重要程度比已往任何时候都高。说起来有点可笑,似乎就在几天之前,笔者就见到过类似的新闻。或许,这是当人逐渐变老之后挥之不去的感觉吧——渴望保持健康以及健美的感觉。不管怎么说,健康与健美是一个重要话题。技术的进步,尤其是移动应用与硬件世界的不断提高,正为这个似乎日益成长的话题带来全新的契机。
HealthKit 是苹果公司推出的一款移动应用平台,旨在为重要、可追踪的健康数据与注重健康、热衷锻炼的科技消费者搭起桥梁。这很酷。用户可以轻松地追踪一段时间内可测量的健身与健康数据。除了了解自身的健康数据,看到图表中喜人的增长曲线也的确鼓舞人心。
关于 OneHourWalker
在本文中,我们将打造一个有趣的小应用,它会从 HealthKit 读取数据,也会向其写入新数据。来见一见 OneHourWalker 吧。
OneHourWalker 是一款追踪使用者在一个小时内行走或跑步之距离的健身应用。用户可以将距离与 HealthKit 分享,之后就能在健康应用中读取之。我知道,一个小时听起来有点过于乐观了(至少笔者本人可能无法坚持下去)。因此,用户也可以提早中止计数,并分享距离。
额,到目前为止,似乎 OneHourWalker 只会向 HealthKit 写入数据。我们需要读取什么数据呢?
好问题!在步行锻炼时,我喜欢选择乡间或林间小路。常常,我会遇到树枝低垂的区域。而我是一条身高 193cm 的汉子,这真的让我很苦恼。解决办法是:从 HealthKit 读取用户的身高数据,将之打印为应用的一个标签。这个标签可以作为对用户的善意提醒,这样,他们就能避免在步行时被树枝打到。
启用 HealthKit
查看 Capabilities 列表的底部,启用 HealthKit。这一简单的操作会将 HealthKit 权限添加到 App ID,将 HealthKit 键添加到 info plist 文件,将 HealthKit 权限添加到授权文件,并且与 HealthKit.framework 相连接。就是这么简单。
开始编程
接下来,跳转到 TimerViewController.swift,开始将 HealthKit 引入 OneHourWalker。首先,创建一个 HealthKitManager 实例。
import UIKitimport CoreLocationimport HealthKitclass TimerViewController: UIViewController, CLLocationManagerDelegate { @IBOutlet weak var timerLabel: UILabel! @IBOutlet weak var milesLabel: UILabel! @IBOutlet weak var heightLabel: UILabel! var zeroTime = NSTimeInterval() var timer : NSTimer = NSTimer() let locationManager = CLLocationManager() var startLocation: CLLocation! var lastLocation: CLLocation! var distanceTraveled = 0.0 let healthManager:HealthKitManager = HealthKitManager()
所有 HealthKit 工作都会在 HealthKitManager.swift 中进行。它会包含重要的方法,我们很快就会谈到。
正如在前文介绍部分所述,我们需要取得用户的许可,才能读取并修改他们的健康数据。在 viewDidLoad()中,我们就得这么做。
override func viewDidLoad() { super.viewDidLoad() locationManager.requestWhenInUseAuthorization() if CLLocationManager.locationServicesEnabled(){ locationManager.delegate = self locationManager.desiredAccuracy = kCLLocationAccuracyBest } else { print("Need to Enable Location") } // We cannot access the user's HealthKit data without specific permission. getHealthKitPermission()}
getHealthKitPermission() 方法会调用 manager 的 authorizeHealthKit() 方法。如果一切顺利,我们便能调用setHeight()方法。不过,我们很快会在后文中谈到此方法。
func getHealthKitPermission() { // Seek authorization in HealthKitManager.swift. healthManager.authorizeHealthKit { (authorized, error) -> Void in if authorized { // Get and set the user's height. self.setHeight() } else { if error != nil { print(error) } print("Permission denied.") } } }
在 HealthKitManager.swift 中,我们会创建 authorizeHealthKit() 方法。然而,除此之外,我们需要创建 HealthKit 存储,用于连接应用与 HealthKit 的数据。
let healthKitStore: HKHealthStore = HKHealthStore() func authorizeHealthKit(completion: ((success: Bool, error: NSError!) -> Void)!) { // State the health data type(s) we want to read from HealthKit. let healthDataToRead = Set(arrayLiteral: HKObjectType.quantityTypeForIdentifier(HKQuantityTypeIdentifierHeight)!) // State the health data type(s) we want to write from HealthKit. let healthDataToWrite = Set(arrayLiteral: HKObjectType.quantityTypeForIdentifier(HKQuantityTypeIdentifierDistanceWalkingRunning)!) // Just in case OneHourWalker makes its way to an iPad... if !HKHealthStore.isHealthDataAvailable() { print("Can't access HealthKit.") } // Request authorization to read and/or write the specific data. healthKitStore.requestAuthorizationToShareTypes(healthDataToWrite, readTypes: healthDataToRead) { (success, error) -> Void in if( completion != nil ) { completion(success:success, error:error) } } }
在请求获取用户健康数据的授权时,我们需要明确指定打算读取以及修改的信息。对本例而言,我们需要读取用户的身高,从而帮助他们躲避有危险的低垂枝丫。我们希望 HealthKit 能提供一个可以转化为可理解的身高的 HKObject 量。此外,我们还要获得修改 HKObject 量的许可,以记录用户的行走及跑步距离。
在处理好 OneHourWalker 与 iPad 通信的可能性后,我们做出官方请求。
在 HealthKitManager.swift 中,创建从 HealthKit 读取用户身高数据的 getHeight() 方法。
func getHeight(sampleType: HKSampleType , completion: ((HKSample!, NSError!) -> Void)!) { // Predicate for the height query let distantPastHeight = NSDate.distantPast() as NSDate let currentDate = NSDate() let lastHeightPredicate = HKQuery.predicateForSamplesWithStartDate(distantPastHeight, endDate: currentDate, options: .None) // Get the single most recent height let sortDescriptor = NSSortDescriptor(key: HKSampleSortIdentifierStartDate, ascending: false) // Query HealthKit for the last Height entry. let heightQuery = HKSampleQuery(sampleType: sampleType, predicate: lastHeightPredicate, limit: 1, sortDescriptors: [sortDescriptor]) { (sampleQuery, results, error ) -> Void in if let queryError = error { completion(nil, queryError) return } // Set the first HKQuantitySample in results as the most recent height. let lastHeight = results!.first if completion != nil { completion(lastHeight, nil) } } // Time to execute the query. self.healthKitStore.executeQuery(heightQuery) }
查询身高数据的第一步是创建一个断言以定义时间参数。我们是在请求一段时间内的所有身高数据——与当前日期相距甚远的一个过去的日期。显然,这会返回一个数组。然而,我们只想要最近期的身高,因此,我们请求数据时可以让最新的数据排在数组的最前头。
在构建这一查询时,我们会把数组的长度限制为1。在考虑好出现错误的可能性后,我们会将结果中的首个也即唯一一个数组项目分配给 lastHeight。接下来,完善 getHeight() 方法。最后,针对用户的健康数据执行查询。
回到 TimerViewController.swift,在 app 真正投入使用之前,假设用户授权了适当的许可,则 setHeight() 方法会被 getHealthKitPermission() 调用。
var height: HKQuantitySample?
func setHeight() { // Create the HKSample for Height. let heightSample = HKSampleType.quantityTypeForIdentifier(HKQuantityTypeIdentifierHeight) // Call HealthKitManager's getSample() method to get the user's height. self.healthManager.getHeight(heightSample!, completion: { (userHeight, error) -> Void in if( error != nil ) { print("Error: \(error.localizedDescription)") return } var heightString = "" self.height = userHeight as? HKQuantitySample // The height is formatted to the user's locale. if let meters = self.height?.quantity.doubleValueForUnit(HKUnit.meterUnit()) { let formatHeight = NSLengthFormatter() formatHeight.forPersonHeightUse = true heightString = formatHeight.stringFromMeters(meters) } // Set the label to reflect the user's height. dispatch_async(dispatch_get_main_queue(), { () -> Void in self.heightLabel.text = heightString }) }) }
在 share() 方法之上,我们会创建 setHeight() 方法。我们请求的身高数据样本以 HKQuantity 返回,标识符 HKQuantityTypeIdentifierHeight 知道这一对象。
接下来,调用在 manager 中创建的 getHeight() 方法。有了身高样本,我们还需要将之翻译为恰当的字符串以展示在标签中。与往常一样,考虑所有可能的错误情况是很重要的。
到此,用户就可以打开 app,查看他们的身高(如果他的健康应用中记录着身高数据),开启计时器,追踪他跑步或行走的距离了。接下来,我们要处理将距离数据写入健康应用的过程,这样,用户才能在同一个应用中保存其所有的健身数据。
在用户结束外出锻炼之后,不管有没有到60分钟,他可能会使用 Share(分享)按钮将其辛苦赚得的运动距离发送到健康应用。所以,在 share() 方法中,我们需要调用 HealthKitManager.swift 的 saveDistance() 方法来实现这一过程。在这个方法中,我们会发送运动距离以及取得该距离的日期。这样,用户便能在第二天争取更好的成绩。
@IBAction func share(sender: AnyObject) { healthManager.saveDistance(distanceTraveled, date: NSDate())}
接下来,回到 manager,我们要在此处创建 saveDistance() 方法。首先,我们要让 HealthKit 知道我们打算写入一个代表步行及跑步距离的量。之后,将度量单位设置为英里,并赋值官方的样本量。HealthKit 的 saveObject() 方法会将此数据写入用户的健康数据。
func saveDistance(distanceRecorded: Double, date: NSDate ) { // Set the quantity type to the running/walking distance. let distanceType = HKQuantityType.quantityTypeForIdentifier(HKQuantityTypeIdentifierDistanceWalkingRunning) // Set the unit of measurement to miles. let distanceQuantity = HKQuantity(unit: HKUnit.mileUnit(), doubleValue: distanceRecorded) // Set the official Quantity Sample. let distance = HKQuantitySample(type: distanceType!, quantity: distanceQuantity, startDate: date, endDate: date) // Save the distance quantity sample to the HealthKit Store. healthKitStore.saveObject(distance, withCompletion: { (success, error) -> Void in if( error != nil ) { print(error) } else { print("The distance has been recorded! Better go check!") } }) }
借助 OneHourWalker,我们便能为全世界 iOS 用户的身体健康贡献一份力量。然而,这只是一个开始。在使用 HealthKit 读取并修改健康数据的道路上,还有非常多的可能性。
当然,对用户而言,拥有这些可追踪数据的好处很多。人们可以轻松地按照日期、星期进行比较,从而激励自己朝着目标努力。不过,真正的伟大之处在于,开发者可以提供全新的,富有创造力的有趣方法来获取数据。
发表评论
暂时没有评论,来抢沙发吧~